Outlook change the level of junk email protection
By default, the Junk Email Filter protection level is set to No Automatic Filtering. You can make the filter more aggressive so that it catches more junk messages. The higher you set the protection level, the greater the risk of some legitimate messages being identified as junk and moved to the Junk E-mail folder.
To turn on the Junk Email filter in Microsoft Outlook, follow these steps. Note that the instructions may vary slightly depending on the version of Outlook you are using. The steps below are for Outlook 2019, Outlook 2016, Outlook 2013, and Outlook 2010
- Open Microsoft Outlook.
- Click on the “Home” tab in the top-left corner of the window.
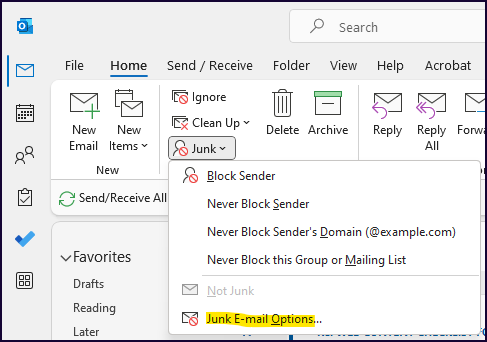
- In the “Delete” group, click on the “Junk” button, and then select “Junk E-mail Options” from the drop-down menu.
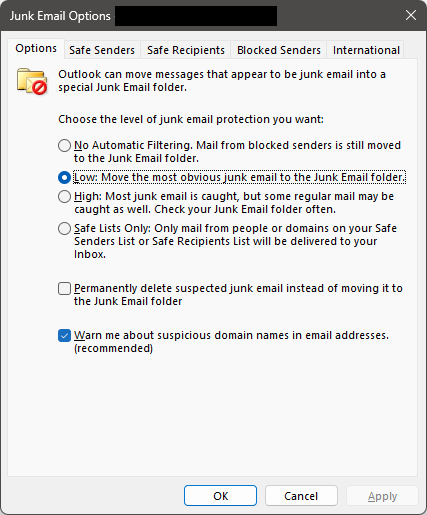
- In the “Junk E-mail Options” dialog box, click on the “Options” tab.
- Select the level of junk email protection you want to enable:
- No Automatic Filtering: This option will disable the junk email filter.
- Low: This option will move the most obvious junk email to the Junk Email folder.
- High: This option provides more aggressive filtering and may occasionally move legitimate emails to the Junk Email folder. Check the folder periodically to ensure important messages aren’t being filtered accidentally.
- Safe Lists Only: This option considers all emails as junk unless they come from senders on your Safe Senders List or are sent to recipients on your Safe Recipients List.
- Click “OK” to save your settings and enable the junk email filter.
It’s a good idea to periodically check your Junk Email folder to make sure important messages haven’t been accidentally moved there. If you find any legitimate emails in the Junk Email folder, you can mark them as “Not Junk” to help train the filter for future messages.